A few years back I created a few small video games using the Lua-based game development framework LÖVE (or love2d). Because they are so small, it doesn't make sense to distribute these games for desktop platforms. But they are great as browser games, so I used Tanner Rogalsky's love.js to convert the games to JavaScript.
The first game I published this way was my Minesweeper clone. This was years back, using LÖVE version 0.10.0. Back then the process was more complicated, but also more reliable. Now the love2d engine is at version 11.3 (they dropped the leading zero), and sadly love.js has not been able to keep up.
Despite this, it is still possible to build your LÖVE games using love.js, which I recently went through for my Tetris clone. But there are some things to look out for. So in this article we will go through the required steps, and add an extra section for troubleshooting common errors.
Before we start
Although you technically don't need to have LÖVE or Lua installed for the actual build process, I do recommend installing it when developing LÖVE games 😉! Besides that, make sure that you have Node.js installed so you can use NPM. Then use NPM to install the latest version of love.js.
npm install -g love.js
If you want to deploy your game using Docker, make sure to install it as well, but this is optional since you can also publish your game to the web without it.
Building a web version of the game
With love.js installed we can build our love game for the web. We can do this with either a game directory or a .love file. It is recommended to use a .love file as this makes sure that only the necessary files are included, keeping the bundle size smaller.
1. Make the game files love.js compatible
Not all current Lua and LÖVE functionality is available in love.js, but luckily most is. These bullet points discuss the most important limitations. This list has information from love.js, LoveWebBuilder, the LÖVE forums, and my own experiences.
- Love.js can only be used for smaller games. Although there is no limit, larger games have a higher chance of crashing or bugs.
- If the
t.versionin yourconf.luafile is set to something other than0.11.0, your game might fail to run. This can be fixed by commenting outt.versionbefore building. - The canvas size of your game cannot be set or reset from your game code, so make sure that you set the dimensions in your
love.conffile witht.window.widthandt.window.height. - Threads are unavailable in the browser, this means that LÖVE threads and audio streams cannot be used. So make sure that you're not using
love.threadand that all audio sources are set to type "static". - FFI is not supported, so using FFI in your game files, or using any libraries that use it is not supported.
- Love.js does not work with system-installed libraries, like those installed with Luarocks. Instead, all libraries should be included as Lua files in your game directory.
2. Create a .love file
We can create a .love file by bundling all game files in a ZIP file and giving it a .love extension. Depending on your platform, this can be done in different ways. There is usually an option in your file explorer, but on Linux and macOS you can also use the zip command line utility.
zip -9 -r <game name>.love <game files>
You can put the whole directory in this ZIP file, but the idea is to only include the necessary game files. In case of packaging my Tetris clone, it looked like this.
zip -9 -r Tetris.love assets/ lib/ src/ main.lua conf.lua
3. Generate your game's JavaScript code
With the .love file generated and love.js installed, we can easily generate the corresponding JavaScript and HTML on the command line.
love.js <love file> <output dir> --title <title> --memory <max memory>
When running the command it is important to set the --memory flag to a high enough value as this cannot be changed after the build. Generally the default option of 16MB should be doable, but it can't hurt to go a bit higher. For my Tetris game I just opted for 64MB as a ceiling.
love.js Tetris.love ./dist --title "Tetris" --memory 67108864
This outputs the generated code in the ./dist directory, from where it can be copied over to a web server or tested locally. You do need to run a web server to run the game though, you cannot just open index.html and be done with it. But a simple Python web server should be fine.
python -m SimpleHTTPServer 3000
After running the web server you can access the game in a browser at localhost:3000.
4. Dockerise the build process
Now this next step is entirely optional. If you want you can just copy over your generated code to any web server to host it, but Docker is a great tool for simplifying deployments. By Dockerising you essentially automate the build process, which saves time if you need to repeat the process.
The way Docker works is we create a Dockerfile, which is a series of instructions that tells Docker what files it needs, and what it needs to do with these files to build and run our game.
Create a Dockerfile
We start by creating a file named Dockerfile in the root game directory, which will tell Docker how it should package our game into a Docker image, which can then be deployed in a Docker container.
Once we created the Dockerfile, we tell Docker to base our image on an existing public Dockerfile, called node:10. We add as build, which gives the Docker image the name build, so we can refer to this Docker image later on.
FROM node:10 as build
Copy the game files
Next we add a few lines to the Dockerfile to copy over all game files to the Docker image. This is similar to creating a .love file, but we put all game files in a folder named /app/src instead of a ZIP file.
After copying, we use the sed command to automatically comment out the conf.lua line containing t.version. This is necessary due to the caveat discussed in step 1.
WORKDIR /app/src
COPY assets ./assets/
COPY lib ./lib/
COPY src ./src/
COPY main.lua conf.lua ./
RUN sed -i "s/t.version/-- t.version/" conf.lua
Building the game with love.js
In the previous steps we told Docker what files it needs. Now we tell Docker what it needs to do with these files. In our case, it should install love.js and run the correct love.js command, like we did manually in step 3. This will take the game files found in /app/src and place the generated JavaScript game in /app/dist.
RUN npm install -g love.js
RUN love.js /app/src /app/dist --title "Tetris" --memory 67108864
Serving the generated files
After the build process is completed, we need to tell Docker how it should serve the generated files. For this we will create a new Docker image within the same Dockerfile, based on the nginx image. We then tell Docker to copy the files from the other image, that we named build earlier. The nginx image then automatically serves all files found under /usr/share/nginx/html.
FROM nginx:1.17.0-alpine
COPY --from=build /app/dist /usr/share/nginx/html
Building and running the Docker image
After following all previous steps, we end up with the following Dockerfile.
FROM node:10 as build

WORKDIR /app/src
COPY assets ./assets/
COPY lib ./lib/
COPY src ./src/
COPY main.lua conf.lua ./
RUN sed -i "s/t.version/-- t.version/" conf.lua

RUN npm install -g love.js
RUN love.js /app/src /app/dist --title "Tetris" --memory 67108864

FROM nginx:1.17.0-alpine
COPY --from=build /app/dist /usr/share/nginx/html
From here, we can build the Docker image with the docker command line tool.
docker build --tag game-image .
Then it can be run locally, after which it is accessible at localhost:3000.
docker run --publish 3000:80 --detach --name game game-image
After running, the container can be shut down and removed again.
docker stop game
docker rm game
Once you're happy with the result, you will likely want to host your Docker container somewhere simple, like Heroku or Google Cloud. Or if you're the DIY type, you can set up a server with DigitalOcean and use the self-hosted Dokku to deploy your game.
Troubleshooting
If you followed the steps outlined above, you should be able to run your game in the browser with or without Docker. However, it's possible that you still run into issues. So in this section we discuss some errors that I experienced myself, but if you run into something else, leave a comment below.
My game is showing Lua errors
The first step with Lua errors is making sure that these errors disappear when you're running your game locally with LÖVE. If they also occur that way, there is likely an unrelated bug in your code that needs to be fixed first.
If the Lua errors only occur in the browser, it is most likely that not all required files were included. So double check that you included all files in your .love file or Dockerfile. Note that these are likely to be different files than those in the example.
It is also important to reiterate that love.js does not work with system-installed libraries, so any libraries like middleclass or penlight need to be included as Lua files in your game folder.
Some errors that can indicate missing files are module 'xxx.yyy' not found, attempt to perform arithmetic on global 'XXX' (a nil value) or No code to run.
The page is showing a black rectangle
If the page is showing a black rectangle where the game should be, the most likely cause is also missing files.
My game is not showing on the screen
If your game is not showing after loading the page, you should check the JavaScript console for errors. In most browsers you can right click the page and select Inspect or Inspect element, then navigate to Console. This shows all JavaScript errors.
The console will always show some errors about threads or audio, because these features are not working reliably in the browser. These errors can be ignored, although they might be difficult to distinguish from more important errors.
> TypeError: Failed to execute 'decode' on 'TextDecoder'
This is a very non-descriptive error, but it generally happens if you forget to comment out the target version inside your conf.lua file. Make sure that you really comment it out or include the corresponding line in your Dockerfile.
The Dockerfile assumes that your config function signature is function love.conf(t). But it is possible that you gave t another name, like tbl or config. In that case you should adjust your Dockerfile accordingly.
My audio is not playing correctly
If your audio stops playing all of a sudden, you might have forgotten to set your audio sources are set to "static". When importing audio files with love.audio.newSource, make sure that the second parameter is set to "static" - see the example below. Note that the official LÖVE wiki recommends using "stream" instead of "static" for background music, but this advice should be disregarded when using love.js.
background_music = love.audio.newSource("assets/audio/background_music.mp3", "static")
Unfortunately audio can still be a bit inconsistent, even when using the "static" type. So for things like background music you might find that the looping doesn't work very well. But it usually works well enough.
Alternative option: LoveWebBuilder
The good thing about the methods described in this article is that it can be largely automated. Either by using Docker, or by adding the build process to a Makefile. This also means that the deployment of your game can be automated like with most other web development.
But maybe that is not important to you. Maybe you don't want to go through all these steps just to build your game for the browser. Or maybe you don't plan on repeating this deployment, so you don't value the automation.
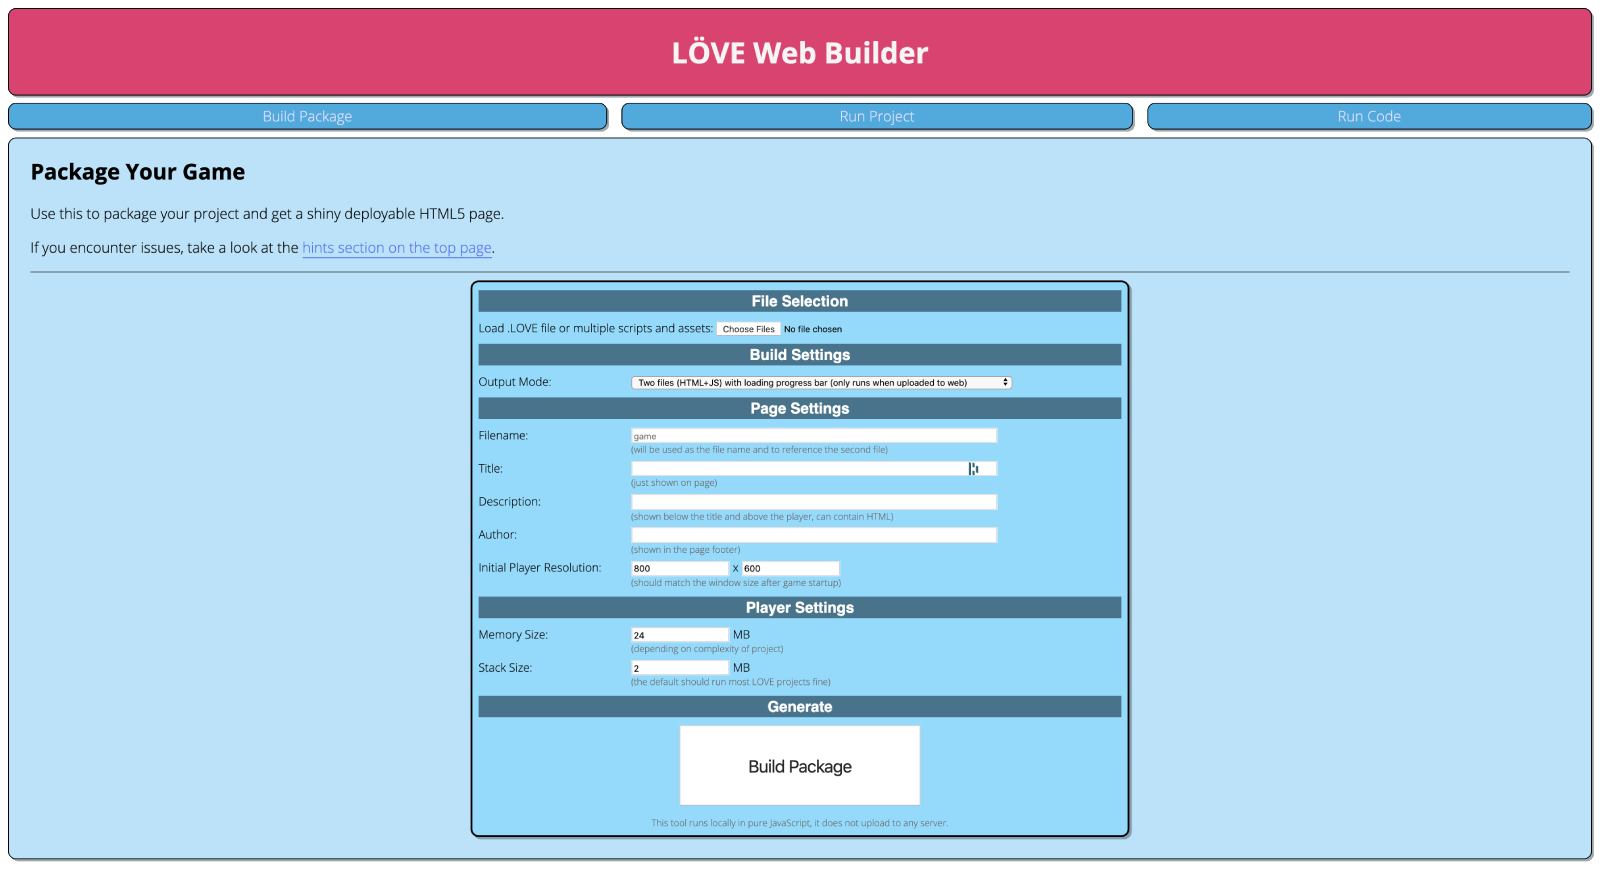
In that case, there is another tool that is built on top of love.js, called LoveWebBuilder by Bernhard Schelling. It still uses love.js for the Lua-to-JavaScript conversion, but LoveWebBuilder is available as a simple to use web application. You just need to select a .love file from your computer and enter some information. The rest is all handled by LoveWebBuilder, making it very accessible for one-time deployments.
Conclusion
Love2d games can be converted to browser games with love.js as long as some of the prerequisites are met. This build process can be automated with Docker by creating a Dockerfile with all build steps. There are some common issues that you could run into, which can usually be solved with the steps outlined above. An alternative to love.js is LoveWebBuilder, which can be used if you prefer to use a simple web-based UI.
Let me know in the comments below if you've published any love2d games on the web so I can check them out. Also let me know whether you followed this guide, used LoveWebBuilder or used a different build process altogether! And don't forget to share this article with your gamedev friends on Facebook or Twitter!